How to repair a leaking flush

If you have heard the sound of your toilet running periodically at random times of the day or night or if the toilet seems to never stop running, you may understandably be wondering what you can do to fix the problem. The fact is that a leaking flush can create annoying and bothersome sounds in your home that can prevent you from relaxing and even sleeping peacefully at night. More than that, this is an issue that can also inflate your water bills due to unnecessary water waste. Fixing the leak immediately can be highly beneficial, and there are a number of steps that you can take to address the problem.

Step 1
First, you should check the flapper located at the bottom of your tank when attempting to repair a leaking flush. Remove the tank lid to inspect the flapper. In some cases, the flapper may be visibly out of place or warped, and you may be able to determine with a basic inspection that this is causing the issue. You may also need to place your hand on top of the flapper and apply pressure to determine if this is the issue. If you apply pressure to the flapper and the toilet stops running, this is a sign that the flapper needs to be replaced. Replacing a flapper involves buying a new flapper and installing it according the directions on the packaging.

Step 2
If the flapper is not the issue causing your leaking flush, you should then inspect the fill valve. To accomplish this, flush the toilet. As the water level is rising in the tank after the flush, lift the float arm up. You may need to adjust the float arm slightly by gently bending it. By doing this, the water level in the tank may stop when the level reaches about a half of an inch or an inch below the fill line on the overflow pipe. This may resolve the leaking flush issue.

Step 3
If this does not remedy the leaking flush situation, your next step should be to remove the fill valve altogether. To accomplish this, turn off the water supply by turning the knobs located at the back of the tank. Then, flush the toilet so that the water drains out of the tank. Remove the rest of the water with a cup and sponge.

Step 4
Once all of the water is out of the tank, remove the water supply line, and unscrew the locknut on the fill valve unit. Remove the old valve, and install a new fill valve unit that you have purchased at a local hardware supply store. It may need to be trimmed down to size using a hacksaw. Ideally, the height of the overflow pipe will be about an inch below the overflow pipe. Ensure that the locknut on the newly installed valve is tight. Then, allow water to fill into the tank again. This should resolve the issue of a leaking flush for you. If it does not, it may be time to call a professional Singapore plumber for assistance with your leaking flush.

A leaking flush can be bothersome and even costly to deal with, so it does make sense to fix the problem quickly. As you can see, there are several steps that you can take to address your problem with a leaking flush, and all of the tools and supplies you need may be found at a local hardware store. While these steps will resolve most issues with a leaking flush, the fact is that some repair issues require greater skills and expertise. If you have attempted to make the repair on your own or if you are not comfortable completing these steps on your own, you can contact a reputable plumber for professional assistance today.

How To Repair or Replace a Leaking Tap

A leaking tap can be problematic to deal with. For many people, the incessant sound of dripping water can be bothersome and annoying. Furthermore, while a leaking tap may only drip small amounts of water at a time, the fact is that this water can add up considerably over time. When a leak is not repaired quickly, the result is that your water bill could be much higher than necessary. Many homeowners would prefer to repair or replace their tap on their own if possible as this would eliminate the need to pay a plumber for repair services. With a closer look at the steps necessary to correct your current plumbing issue, you may be able to determine if you can handle this issue on your own or if you need to call a professional for assistance.

Step 1: Before you begin working on your tap, you will need to turn off the water supply. In most cases, you can simply turn the knob located under the sink to the off position. If this does not stop the water supply, you will need to turn off the main water supply to the house while you complete the work. This main water supply may be located in your basement or in your yard if you do not have a basement.

Step 2: Inspect your faucet to determine which type of faucet you have. There are two main types. One is a washer faucet, and this type of faucet has separate hot and cold knobs that rotate to control water flow. The other type is a ceramic faucet, and it has a lever design that moves in an upward and downward motion.

Step 3: If you have a washer faucet, you will need to remove the cover on the faucet. Typically, these are plastic covers that can easily be flipped off with a flat surface, such as a screwdriver head. Once removed, you will see screws. Remove these screws and nuts to locate the rubber washers. Replace these washers with new washers that you purchase at a local store. Then, reassemble the faucet by replacing the nuts, screws and covers.

Step 4: If you have a ceramic faucet with a lever design, you will need to research the brand name and model number of the faucet. Then, remove the cover and screws, if possible. The steps to repair this type of faucet can vary somewhat due to the unique designs of each model. However, you should be able to remove covers and screws with most models. You should find a canister mechanism that is held in place with cotter pins and screws. Find a replacement canister mechanism at a local hardware store using the brand name and model number. Then, simply replace the old canister mechanism with the new one, and replace the cotter pins, screws and covers.

The fact is that replacing or repairing a leaking tap may be fairly straightforward and simple for some, but it can be a frustrating, challenging process for others. For example, sometimes the screws, washers or canister mechanisms are stuck in place and are difficult to remove. In other cases, the homeowner cannot locate the right replacement materials at local stores. If you have attempted to fix your leaking tap on your own or if you would prefer to simply let a professional handle this task for you, you can schedule service with a Singapore plumber today. The fact is that leaks tend to become worse over time, and they will waste water unnecessarily each day until they are fixed. With this in mind, you should repair it yourself or schedule service with a plumber today without delay.

Related articles: How to repair a leaking flush

How To Repair a Leaking or Burst Pipe

Pipes are designed to provide a homeowner with years of hassle-free use, but the fact is that they can develop smaller or larger leaks over time. Leaks may develop due to loose joints, weather-related events, impact to the pipe and more. Whether a leak is larger or smaller in size, it is imperative to repair it quickly. Even a small amount of water that is leaking from a pipe can result in costly water waste, water damage and even destructive mold growth in your property. By learning more about the different steps that you can take to fix your leaking or burst pipe, you can determine if this is a project that you want to tackle on your own or if you should call a professional plumber to repair the leak for you.

Our plumbers are located island wide in Singapore so as to provide fast response to any emergency cases that may occur due to a leaking or burst pipe. For more information you can drop us a call at 9616 6035.

Pipe leak or burst? Call a plumber now at 9616 6035

While waiting for our plumbers to arrive you can follow the following steps:

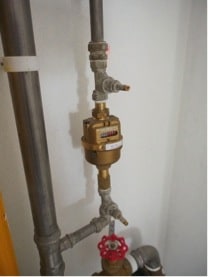
water meter main shut off valveStep 1: First, you should turn the water to your property off as soon as you suspect a leak. This will eliminate unnecessary water waste while you repair the leak, and it will also prevent unnecessary additional damage to your property. If your leak is located on a pipe under the sink, you can turn off the localized knob attached to the sink. If it is located elsewhere, it may be necessary to shut off the main water supply to the home.

Step 2: Then, you will need to determine the location of the leak. Some leaks are easy to find because they are located on pipes under your sink or in other visible areas. In some cases, however, you may discover a wet area on your wall or floor that indicates a leak, but the leak may be located deep inside your wall. While plumbers can use advanced leak detection equipment to pinpoint the leak’s location, you may need to cut away patches of drywall to find your leak. Keep in mind that a pipe that is wet to the touch is not necessarily leaking. Condensation can make it look like a pipe is wet due to sweating. If a pipe is sweating, different steps to stop the moisture would be required.

Step 3: Determine which repair option is most suitable for the leak. There are many ways to repair a leak. For example, a leak located at a joint may be repaired by simply tightening the fittings around the joint. If the leak is located away from the joint and is relatively small in size, you may use a rubber patch with a C-clamp to seal off the leak. Another option is to use a waterproof epoxy or waterproof tape over the leak. If the leak is larger or if you have copper pipes that require soldering, the need for professional services may be critical.

It is important to note that some leaks are caused by older pipes that have become weakened due to corrosion or other factors. If your leaks are caused by corrosion or general weakness, you may find yourself regularly dealing with leaks until the pipes are replaced. A Singapore plumber should be called on for replacement service if this is the case.

Water leaks are serious issues for homeowners, and this includes even small leaks that may initially seem rather minor. It is imperative that a homeowner takes immediate steps to turn the water supply off and to fix the leak as soon as possible. If you have noticed that you have a leak on your property, you can inspect the pipe initially to determine what repair efforts may be required. By taking this step, you can then determine if repairing your leaky or burst pipe is a task that you want to tackle on your own.

Related articles: How to Repair or Replace a leaking Tap

Call Now Button